Instructions for Use
Synergy Solutions, Inc.
© 1997-2001 Synergy Solutions, Inc.
1. Overview
Launch ‘Em is the most advanced applications launcher available for the Palm Computing Platform. Its purpose and function is to help you organize the applications and databases on your Palm handheld and provide a quick and easy method for launching them. Launch ‘Em provides ease of use as well as a set of powerful features that combine to make it the great application that it is.
2. Installation
The first thing you need to do after you download Launch ‘Em or receive Launch ‘Em on a CD is to install it onto your Palm handheld. There are extensive installation instructions on our web site at the following address: http://www.synsolutions.com/support/. There are also installation instructions in your Palm handheld’s handbook/instruction manual.
The easiest way for Windows users to install Launch ‘Em is to use the installer. If you are downloading Launch ‘Em from the internet, choose the .exe or Installer option to download the installer.
** IMPORTANT UPGRADE NOTICE **
If you are upgrading from Launch ‘Em 2.13 or above, please read this:
Launch ‘Em 3 will install easily over any version of Launch ‘Em 2.13 or above. Your preferences, tabs, and settings will be preserved. Before installation, make sure to turn off the "Always Use Launch ‘Em" preference in the Launch ‘Em General Preferences. Failure to do so will result in the new versions of the plugins to NOT be installed onto your handheld.
If you use LaunchEmAppHack, you MUST go to the HackMaster application and deactivate LaunchEmAppHack by making sure that it’s UNCHECKED before installing a newer version. Failure to do so will result in a crash, and your upgrade may not work.
If you are upgrading from Launch ‘Em 2.12 or below, read this:
If you use LaunchEmAppHack, you MUST go to the HackMaster application and deactivate LaunchEmAppHack by making sure that it’s UNCHECKED before installing a newer version. Failure to do so will result in a crash, and your upgrade may not work.
We recommend that you delete Launch ‘Em from your handheld before installing Launch ‘Em 3. This will mean that you will have to set your preferences
** IMPORTANT UN-INSTALL NOTICE **
If you ever decide to delete Launch ‘Em, you should first uncheck "Always use Launch ‘Em" in the Launch ‘Em preferences so that the built-in applications launcher is used after Launch ‘Em is deleted. If needed, you can re-install Launch ‘Em, uncheck the preference, and then delete Launch ‘Em again. Please see Appendix A, below, for more information.
** NOTE **
After you have installed Launch ‘Em, your handheld will ask you to perform a soft-reset. This will not harm your Palm handheld nor will it cause any data loss.
3. Getting Started
3.1. Starting Launch ‘Em
NOTE: Launch ‘Em operates on both color and grayscale (and black & white) handhelds. When it makes sense, in the PDF and HTML versions, this manual will show color and grayscale screenshots side by side. If there is only one or the other, you can assume that it is only a color or only a grayscale function or that there is a similar picture that is just not shown. The print version of this manual is all in black & white and no pictures will be in color.
Once you have installed Launch ‘Em you should see its icon in the applications launcher when you tap the silk-screened applications (or home) button. The Launch ‘Em icon looks like this:
![]() or
or ![]()
Figure 1: Launch 'Em Icon
Tap on that icon. The first thing you will see is this screen:

Figure 2: Welcome Screen
(Note: the color screen is shown, there is an analogous grayscale screen)
Read this screen. The second part is important. (See Appendix A, below, for more information.) More than likely you will want to tap Yes. This will automatically make Launch ‘Em your default applications launcher. When you tap the applications button Launch ‘Em will pop up instead of the built-in applications launcher or another launcher. If you tap No and you decide later that you want to make Launch ‘Em your default applications launcher, set the "Always Use Launch ‘Em" in the General Preferences screen.
Next you will be presented with the option of importing the category settings from the built-in applications launcher. Choosing ‘Yes’ will create a Launch ‘Em tab for each category you have set up, and place the icons for those applications in the corresponding tab in Launch ‘Em.

After you tap Yes or No you will see a screen that looks similar to this:
 or
or 
Figure 3: First View of Launch 'Em
The screen may not look exactly like this based on which handheld you have and what applications you have installed on it. (For example, on Palm VII handhelds there will be another tab called "PQAs.")
3.2. Tour of the Main Screen
There are three parts to the main screen: the Tabs, the Databases Window, and the Toolbar.
Figure 4: Tabs |
Figure 5: Databases Window |
or
or
Figure 6: Toolbar |
3.2.1. Tabs
The Tabs can be positioned to the left of the Databases Window (as shown) or to the right, above, or below. This can be set in the General Preferences screen. The different Tabs (Apps, Utils, Games, for example) are used for filing away your various applications and databases. NOTE: Launch ‘Em displays not only applications but also any type of database you choose. This means that you can show ListMaker databases, HackMaster Extensions (HACKs), DOCs, and PQAs (For Palm VII and other wireless handheld users). You can make new tabs, rename tabs, delete tabs, and set a tab’s view preferences all from the Tab menu. You can access the contents of a tab by tapping on the tab. You can drag-and-drop tabs to rearrange the order of the tabs.
3.2.2. The Databases Window
The Databases Window is used to show all of the databases that are being displayed in the current tab. From this window you can launch an application by tapping on it.
3.2.3. The Toolbar
The Toolbar is the command center of Launch ‘Em. It shows all kinds of relevant information and houses the gadgets. There are many parts to the toolbar. All of the parts show when the toolbar is expanded, some show when it is compact and none show when it is hidden.
Expanded Toolbar
![]()
![]()
![]()
Figure 7: Expanded Toolbar (Color, Grayscale, Black & White)
The figure above shows the expanded toolbar in color, grayscale, and black & white. As you can see all the parts are the same, only the coloring is different.
![]()
![]()
The two icons above are buttons, the "toolbar hide" (left) and "toolbar compact" (right) buttons. If you tap on the "toolbar hide" button, the toolbar will switch to hidden mode. If you tap on the "toolbar compact" button, the toolbar will switch to compact mode.
![]()
![]()
Above is the Date/Day display. On the pictures of the toolbars you see above, you only see "Friday" but if you tap on that section of the toolbar, it will toggle to display the date (in long format)
![]()
Above is shown the time. This part of the toolbar only displays the time, you cannot tap on it.
![]()
![]()
![]()
The three pictures above are the battery and memory meter. There are four modes to this meter, battery percentage, battery volts, memory percentage, and memory kilobytes. When a handheld with a rechargeable battery is in the cradle being charged, both battery meters will show "Chrg." instead of the percentage or volts. (This is also the case on the Palm OS Emulator.) On color handhelds, the meters will change from green to yellow to red depending on the level of the meter. You can tell whether the battery or the memory meter is being displayed based on the little icon to the left of the meter:
![]()
![]()
![]()
Figure 8: Enlarged Battery Icons (Color, Grayscale, Black & White)
![]()
![]()
![]()
Figure 9: Enlarged Memory Icons (Color, Grayscale, Black & White)
![]()
The picture above shows the gadgets section of the toolbar. All ten (10) gadgets show when the toolbar is expanded. See the section below on gadgets for more information on gadgets and plugins.
Compact Toolbar
![]()
![]()
![]()
Figure 10: Compact Toolbar (Color, Grayscale, Black & White)
The figure above shows the compact toolbar in color, grayscale, and black & white. As you can see all the parts are the same, only the coloring is different.
![]()
![]()
The two icons above are buttons, the "toolbar hide" (left) and "toolbar expand" (right) buttons. If you tap on the "toolbar hide" button, the toolbar will switch to hidden mode. If you tap on the "toolbar expand" button, the toolbar will switch to expanded mode.
![]()
![]()
![]()
Above is the Time/Day/Date display. If you tap on this area of the toolbar it will toggle between displaying the time, day of week, and date.
![]()
![]()
![]()
The battery and memory meter works exactly the same in the compact toolbar as in the expanded toolbar.
![]()
The above picture shows the gadgets. The four gadgets that are not grayed out appear in the compact toolbar. As you can see only a subset of the gadgets appears in the compact toolbar, keep this in mind when you position your gadgets in the toolbar.
Hidden Toolbar
![]()
![]()
![]()
Figure 11: Hidden Toolbar (Color, Grayscale, Black & White)
If the toolbar is hidden all you will see is a line and a triangle like you see above. If you tap on any part of the hidden toolbar, the toolbar will switch to compact mode.
3.3. Organizing Databases & Tabs
Now that you have all of these icons in the Apps tab, you will want to make new tabs and file your icons away.
Launch ‘Em supports drag-and-drop all over the place. You can drag databases to new locations in the database window, to new tabs, and to certain gadgets. You can drag tabs to new tab locations as well.
Make a New Tab
Choose "New Tab" from the Tab menu. A New tab will be made and you’ll see the Tab Preferences screen. Enter a new name for the Tab and tap OK. For more information on the tab preferences see the Tabs section.
Moving Databases
To move a database to a new tab, simply drag it to the desired tab and drop it there. You can choose to have the databases sorted alphabetically in a tab or you can sort them manually. If the tab is sorted manually then you can rearrange the icons in a tab by dragging them in the Databases Window. A rectangular outline will appear around the spot where the icon will be moved.
Moving Tabs
To move a tab to a new location, drag it there.
3.5. The Tour Continues...
There are three menus in Launch ‘Em, Options, Tab, and Palm:
|
|
|
Figure 12: Launch 'Em Menus
NOTE: To access the menus, tap on the menu button, which is to the left of the graffiti area, just below the home or applications button.
The Options Menu:
The Tab Menu:
The Palm Menu:
4. Tabs
4.1. Tab Basics
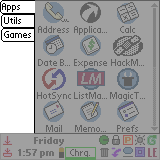
Figure 13: Tabs
The tabs are the part of the picture above that is not grayed out. There are three tabs in this picture: "Apps," "Utils," and "Games." Tabs are used to store your different databases (icons). You can create as many tabs as you like. You can rename existing tabs.
Use the Tab menu to create and delete tabs and change the settings for a tab. When you choose "New Tab" from the tab menu you will be presented with the Tab Preferences screen where you will be prompted to enter a name for the new tab.
To access the contents of a tab, tap on that tab. In the picture above, the "Apps" tab is the current tab. All of the icons showing are in the "Apps" tab.
4.2. Tab Preferences
The Tab Preferences screen looks different on a color handheld than it does on a grayscale handheld because, on the color handheld, you have the option to choose a tab’s color and text color.
Figure 14: Tab Preferences (Color) |
Figure 15: Tab Preferences (Grayscale, Black & White) |
There are seven attributes of a tab that are common to color and grayscale handhelds.
4.2.1. Colors
(If you do not use a color handheld, please go to section 4.2.2)
On color handhelds you can also change the color of a tab and the text color in a tab. If you tap on the colored squares next to "Tab Color" and "Text Color" you will see a color picker screen that looks like this:
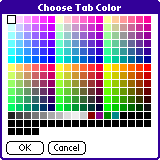
Figure 16: Color Picker Screen
If, for example, you choose tan for the "Tab Color" and brown for the "Text Color" your tab will look like this:
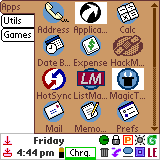
Figure 17: Brown Tab with Blue Text
As you can see, the tab border color matches the text color. Also, "legacy" icons like the "HackM…" icon in the picture will also draw in the text color. Legacy icons are older black & white icons that do not have colored or grayscale versions created for them.
NOTE: Some icons, like the "Applica…" and "MagicT…" icons in the picture above, will have a white rectangle around them. This means that they were not created with a transparent color. This is not a Launch ‘Em error.
However, we have included a gadget plugin called ‘Icon Transparency’ that attempts to make the app icons transparent to fix this problem in older applications. To fix the icons, simply tap the ‘Icon Transparency’ plugin and it will fix all icons on the device.
4.2.2. View Type, Columns, and Labels
There are three choices for View Type: Large Icons, Small Icons, and List View. You can choose from 1 to 5 columns for icon views and from 1 to 3 columns in list view.
The picture below shows a tab displaying large icons in 3 columns.

Figure 18: Large Icons, 3 Columns
You can change to small icons now and you will see the following view.
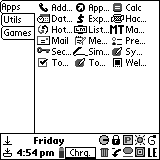
Figure 19: Small Icons, 3 Columns
As you can see, showing small icons in three columns is not very viewable. So let’s change it to two columns.
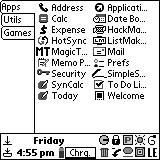
Figure 20: Small Icons, 2 Columns
Now we can change to list view to see some more information about the databases.
TIP: If you are currently showing in either icon view, you can tap on the currently active tab (in this case "Apps") to toggle to list view.
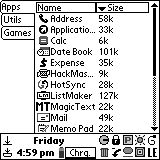
Figure 21: List View, 2 Columns
Now you can see two column headings, "Name" and "Size" and the corresponding information for all of the databases.
The triangular trigger next to the word "Size" is a trigger for a pop-up list that lets you display other types of information about the databases.
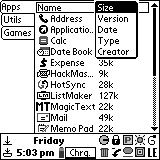
Figure 22: List View Column Types
As you can see, you can display the Size, Version, Modification Date, Type, and Creator of the database. You can change the information displayed by tapping on the pop-up trigger to pop up the list seen above and choosing another item from the list. Here is a list with the Version information showing.
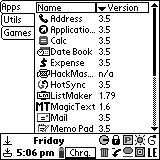
Figure 23: List View, Version Displayed
You can sort the list on any column by tapping on the header of the column. Tap on the "Name" header and it will change the alphabetical sorting to reverse-alphabetical.
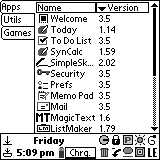
Figure 24: List View, Sorted Reverse-Alphabetical
If a list is sorted alphabetically and you tap on the Name column, it will be sorted reverse-alphabetically. If you tap on a column that is not currently being sorted on, it will sort the list on that column. If you tap on the same column again it will sort it in reverse.
You can resize a column by tapping dragging the border between the headers to the right or to the left. You cannot move the far left or far right ends of the column headers.
Figure 25: Resizing a Column |
Figure 26: Resized Column |
If you show three columns in the list view you will get another column that you can set to display any of the five choices above. The first column will always display the icon and the name; you cannot change that.
Fonts
There are four fonts available on handhelds with Palm OS 3.0 and above. If your handheld has a version of Palm OS less than 3.0, you may not see all four font choices.
If you change the font in the list view it may look like the following picture.
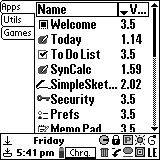
Figure 27: List View, Large Font
Let’s go back to large icon view and uncheck the "Show Labels" option. As you can see below, none of the database names are displayed.
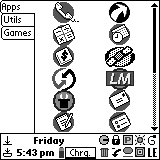
Figure 28: Large Icons, 2 Columns, Labels Not Shown
As you can tell by now, there are a lot of different ways that you can display the databases. Now you can experiment with the options and find your favorite.
4.2.3. Sort Order
You can choose to have a tab sorted alphabetically or manually. Additionally, the list view allows for other sort orders.
List View Sorting
You can sort the list on any column by tapping on the header of the column. If a list is sorted alphabetically and you tap on the Name column, it will be sorted reverse-alphabetically. If you tap on a column that is not currently being sorted on, it will sort the list on that column. If you tap on the same column again it will sort the list in reverse.
Manual Sorting
You can also sort a list manually, meaning that you can drag and drop the icons and put them in any order you choose. To do this, choose "Manual" from the Sort Order pop-up list in the Tab Preferences screen and tap the OK button.
To move icons to other positions in the tab, simply drag-and-drop them to the desired position in the list. The following four pictures show how to move "ListMaker" to the top left position in the tab.
Figure 29: Moving Icons: Inital View |
Figure 30: Selecting ListMaker |
Figure 31: Dragging ListMaker |
Figure 32: Moving Icons: Final View |
When in manual sort mode, you will see outlines of the icon positions drawn as you drag a database over them.
4.2.4. Hidden Tabs
If you check the "Hidden Tab" option in the Tab Preferences screen, that tab will be marked private and will be hidden when private records are hidden or masked. Use the "Hide/Show Private Records" gadget or the Security application to hide and show private records.
4.3. Tab Sequence
You can change the order of the tabs by dragging and dropping them in the desired location.
5. General Preferences
5.1. General Preferences and More General Prefs
There are two screens of general preferences in Launch ‘Em, the "General Prefs" screen and the "More General Prefs" screen
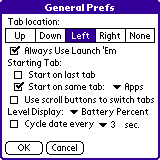
Figure 33: General Prefs Screen
Figure 34: More General Prefs (Color) |
Figure 35: More General Prefs (Grayscale, Black & White) |
Like the Tab Preferences screen, there are color choices on color handhelds.
5.2. Colors
(If you do not use a color handheld, please go to section 5.3)
There are two color settings in the More General Prefs screen, "Background Color" and "Toolbar Color."
The background color is the background behind the tabs. The following picture is what a red background and a blue toolbar looks like.
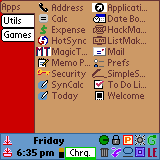
Figure 36: Red Background, Blue Toolbar
5.3. Tab Location
The tab location determines where the tabs will draw. Choose up, down, left, right, or none. See examples:
Figure 37: Tabs Up |
Figure 38: Tabs Down |
Figure 39: Tabs Left |
Figure 40: Tabs Right |
Figure 41: No Tabs (None) | |
5.4. Always Use Launch ‘Em
This setting makes Launch ‘Em your default launcher. If this is checked then any tap on the applications button will launch Launch ‘Em. IMPORTANT: You should always uncheck this option before you delete Launch ‘Em or the Palm OS will still think Launch ‘Em belongs to the applications button and there will be strange problems when the Palm OS cannot find Launch ‘Em.
5.5. Start on Last Tab / Start on Same Tab
If you have Start on Last Tab checked then Launch ‘Em
will remember what tab you were on whenever you leave Launch ‘Em and bring that tab up when you next use Launch ‘Em. If you have Start on Same Tab checked then Launch ‘Em will start on the tab you specify every time you use it.
5.6. Use Scroll Buttons to Switch Tabs
If this is checked then the hard scroll buttons (the physical buttons on your Palm handheld) will rotate through the tabs rather than scrolling the databases window. If you have a Sony Clie (or another Palm handheld with a jog dial) the jog dial will act the same as the scroll buttons.
5.7. Level Display
This setting lets you decide which of the four meters you would like to see in the toolbar. Choose the battery percentage, battery volts, free memory in kilobytes (or megabytes), or free memory as a percentage of total memory.
5.8. Cycle Date
If this is checked then the date field in the toolbar will cycle between date and day of week when the toolbar is expanded and date, day of week, and time when the toolbar is compact.
5.9. Copy/Move Icons Between Tabs
This option determines how Launch ‘Em will act when you drag and drop icons to other tabs. If you have "Copy" selected, a copy of the dragged icon will be made in the destination tab. If you have "Move" selected, the icon will be moved to the destination tab (and removed from the source tab). If you have "Ask" selected, Launch ‘Em will ask you if you would like to copy or move the icon each time you drag one to another tab.
Use the "Remove Icon From Tab" gadget to remove copies of icons form tabs. See the Gadgets section for mare information.
NOTE for previous Launch ‘Em 2 users: The Copy/Move indicator and button has been removed from the toolbar and replaced with this setting.
5.10. Screen Depth
This setting allows you to set the screen depth used in Launch ‘Em. The screen depth is the number of colors that the screen displays. Some handhelds will only have "Black and White" as an option, others will have more choices. The number of choices depends on the type of handheld you have.
This setting determines which depth Launch ‘Em will use while it is running. Launch ‘Em will remember the screen’s setting before it is launched and set it back when you quit Launch ‘Em.
NOTE for Handspring Visor Prism users (and other devices that display more than 256 colors): The color picker in Palm OS 3.5 does not work unless the screen is set to display 256 colors. It will crash if the screen is set to 65k colors (16-bit color) or more. Therefore, Launch ‘Em only allows the use of a maximum of 256 colors (8-bit color).
6. Default Database Placement
You can set which tabs new applications and databases will be placed in when they are found by Launch ‘Em. This settings screen is the place that you set this up. This is also the way to have other types of databases shown in Launch ‘Em. The screen looks like this:
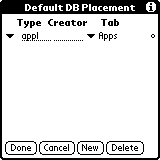
This is the default setting. This means that databases of type ‘appl’ and with any creator (any application) will be shown in Launch ‘Em and they will be placed in the Apps tab whenever new ones are found. To find the Type and Creator identifiers for a specific application or database, simply use the AppMap gadget.
Add a few more:
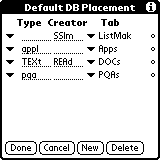
These settings specify that:
The order of these settings is important because when Launch ‘Em is filing databases into tabs, it stops at the first Default Placement setting that is appropriate for a given database. Use the small circle to the right of the items to drag them to a new position.
Preference panels (e.g. Buttons, Owner, etc.) are also supported in Launch 'Em (2.13 and later), enabling instant access to your Palm settings.
Use the popup trigger at the left side of an item to choose a built-in type/creator combination.
Use the popup trigger at the right side of an item to choose the tab.
You can enter any type and creator into a default setting. Leave a field blank to use it as a wildcard.
For more information on this feature and applications that support the sysAppLaunchCmdOpenDB feature, please see this page on the Synergy Solutions web site on the internet:
http://www.synsolutions.com/software/launchem/launchcommand.html
7. Gadgets
7.1. Overview
The gadgets are located in the right side of the toolbar. The expanded toolbar shows 10 gadgets and the compact toolbar shows 4 gadgets. The gadgets perform helpful tasks.
You can determine which gadgets you would like to display in the toolbar by using the Gadget Settings screen.
Figure 42: Gadget Settings (Color) |
Figure 43: Gadget Settings (Grayscale) |
Tap on a gadget position and a popup trigger will appear below. Choose a gadget from this list to have it appear in the chosen spot.
Remember that only the four gadgets on the bottom right will show when the toolbar is compact.
![]()
Figure 44: The 4 Gadget Positions That Show In A Compact Toolbar
Some gadgets are built into Launch ‘Em and others are plugins. Plugins can be found on the Synergy Solutions web site and are also bundled with Launch ‘Em.
Some gadgets can be tapped, some gadgets can have databases dragged onto them, and some can do both. You can find out if you can drag a database onto a gadget by dragging a database to the gadget area. If the gadget’s name appears in a pop up box when you drag over it, you can drop the database on it to perform the function.
7.2. Description of the Built In Gadgets
Launch ‘Em has 13 built-in gadgets. Any other gadgets are plugins. Shown in the list below are the three possible gadget icons (color, grayscale, black & white) [Icons], the name of the gadget [Name], the description of the gadget [Description], and whether or not you can tap [T] and/or drag [D] on the gadget.
Icons | Name | Description | T | D |
| AppMap | Allows you to choose which application will be used to open a given type of database. Drag a database onto the gadget to choose the application you want to open the database. You will need to know the application’s creator code which can be found out by using the GetInfo plugin gadget or the list view. | • | |
| Apps List | Tap to bring up a list of the most recently used apps and the most commonly used apps. | • | |
| Backlight Toggle | Turns on and off the backlight on grayscale and black & white handhelds. | • | |
| Gadget Settings | Brings up the Gadget Settings screen. | • | |
| Graffiti Reference | Brings up the Graffiti Reference screens. | • | |
| Hide/Show Private Records | Toggles between hiding and showing private records. Requires your password if you have it set. | • | |
| Launch ‘Em Quick Menu | Pops up a list of useful functions. | • | |
| Power Off | Turns off the handheld. | • | |
| Power Off & Lock | Turns off and locks the handheld. | • | |
| Remove Icon From Tab | Removes an icon from a tab. If the icon is the only instance of that database, this gadget will do nothing. | • | |
| Rename Icon | Allows you to rename any icon. | • | |
| Spawn | ‘Proxy’ taps and drags via this gadget. If you TAP the spawn gadget, a list of all installed tap-able gadgets will be shown, allowing you to choose any of them. If you DRAG an item to Spawn, a list of all available drag-able gadgets will be shown. This allows you to tap or drag to a gadget without that gadget being visible on the toolbar. | • | • |
| Trash Can | Drag to delete a database. Tap to bring up a list of all databases on the handheld to delete. | • | • |
7.3. Plugins
When you install plugins for Launch ‘Em they will appear in the popup list in the gadget settings screen.
There are 6 bundled plugins that Synergy Solutions has created. Shown in the list below are the three possible gadget icons (color, grayscale, black & white) [Icons], the name of the gadget [Name], the description of the gadget [Description], and whether or not you can tap [T] and/or drag [D] on the gadget.
Icons | Name | Description | T | D |
| BeamMe | Drag an icon to beam the database to another handheld. Tap to bring up a list of all databases on the handheld to beam. | • | • |
| Brightness / Contrast | Brings up the brightness slider on color handhelds and the contrast slider on certain grayscale handhelds. Does nothing on pre-Palm OS 3 handhelds. | • | |
| GetInfo | Drag an icon to get lots of information about the database. Tap to get system information. | • | • |
| LaunchIt | Assign a database to the gadget which will be launched when you tap the gadget. | • | • |
| Network Panel | Brings up the network preference panel. | • | |
| ScreenDepth | Use to change the screen depth (number of colors displayed) on the handheld. | • |
To delete Launch ‘Em plugins, tap on the "Delete Plugins" button. This will bring up a list of the installed plugins. Tap on the plugin you wish to delete and tap the "OK" button to delete it. This is the recommended way to delete Launch ‘Em plugins. If the plugin cannot be deleted, reset your handheld by choosing "Warm Boot" from the Launch ‘Em menu and trying again.
8. Miscellaneous
8.1. Launch ‘Em App Hack
The Launch ‘Em App Hack is a HackMaster extension that will bring up a list of recently used and commonly used applications and databases, even if you are not in Launch ‘Em! This is one of the most popular features of Launch ‘Em. To use the App Hack, install the "LaunchEmAppHack.prc" file. You also have to have HackMaster installed. If you don’t have HackMaster, please install it from the CD or download file you received or go to http://www.daggerware.com/ to download it. Once the App Hack and HackMaster are installed, run HackMaster and check the check box next to LaunchEmAppHack.
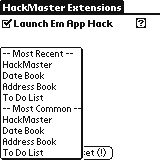
Now the HackMaster extension is enabled. Once it’s enabled all you have to do to invoke it is start the pen on the applications button and drag it about an inch upward into the screen and let go. The list of "Most Recent" and "Most Common" applications used appears. NOTE: In order to make the most recent and most common lists more useful, Launch ‘Em will not place applications linked to the hard buttons or silk-screen buttons in these lists.
Another feature of the Launch ‘Em App Hack is to switch to the last application you were using. To do this, start the pen on the applications button and drag it down to the menu button and let go.
Dragging the pen from the Applications button to the RIGHT (in the Graffiti Area) and letting go will display a list of ALL applications installed on your Palm OS Device. You can choose an item from the list to run it, or simply enter the first letter of the name of the application you want to run, and the list will auto-scroll to that item.
8.2. Removable Media
Launch ‘Em supports removable media such as the Handspring 8MB Flash Module and compact flash units on a TRG Pro using AutoCF. Launch ‘Em will also support other forms of removable media providing they are transparent to the system.
If the Handspring 8MB Flash Module, for example, is inserted for the first time, Launch ‘Em will be launched and will scan for applications on the flash module. If applications are found they will be filed into tabs using the default database filing rules (see above). You can move these new applications to other tabs as you like. If you then remove the flash module, the locations of the applications on the flash module will be saved for the next time you insert the module. So, it, for example, you have an application called ListMaker on the flash module and you store it in a tab called "Synergy," that location will be saved if you remove and re-insert the flash module.
NOTE for TRG Pro AutoCF users: at the time this was written, databases that are stored in compact flash (CF) cannot be beamed and the BeamMe plugin does not allow them to be beamed. This is not a Launch ‘Em problem. This is an issue with CF.
NOTE: This feature has a side effect. If you delete an application from your handheld its location will be saved if you ever happen to install that application again. So if you install an application and it doesn’t appear in the default tab, you may have had it on your handheld before and it’s back in the tab you used to store it in.
Power User Tip: Launch ‘Em saves 100 removed database locations. The list of these databases is stored in a database called "LERemoved." The value (100) is stored in a resource in the Launch ‘Em application database which is called "LaunchEm2." You can change this value by using a resource editor. The value resides in resource 'RQSZ' ID 1000.
9. Conclusion
Please email launchem@synsolutions.com with any comments/suggestions/praise. Please see our web site for technical support: http://www.synsolutions.com/support/. Don’t forget to look to the Launch ‘Em homepage for information and additional plugins:
http://www.synsolutions.com/software/launchem/
Thanks for using Launch ‘Em!